The experiment
Materials
|
1- IPod 4th generation iPod Using this app: https://itunes.apple.com/ca/app/luxmeter/id526675593?mt=8
2 - 22 x 25 sheets of Aluminum foil 1- 330-ohm resistor 1- Thermometer with digital display Model ( TPI 316C ) +/- 2 4- AlGaInP Green LEDs ( 50 Lux ) 1- Hair drier ( doesn't matter which one because temperature will still have same relationship with the LED. 1- Roll of Masking tape About ½ a meter of Wire- single strand ( so you can put into breadboard ) 1- Pair of Wire cutters 1- Pair of Wire strippers 1- Hard leveled platform (we used the lid box) 4- Alligator clips 1- Pen or Pencil Few sheets of Paper (for recording Data) |
Optional Materials:
1- 7809 ic voltage regulator 1- 20V 300 mA DC AC adapter. Note: You may use any type of regulator that only allows 11 v to 35 v. 1- Breadboard |
Procedure
preparing the experiment
1. Using the aluminum foil, construct a box with the dimensions 9cm by 6 cm by 12 cm.
2. Cut two holes in middle of the 9cm by 6 cm sides: one to place the L.E.D light and the other for the light sensor on the iPod. The hole cut out for the L.E.D light should be slightly narrower and wider than the other, and the hole cut for the iPod sensor should be more of a square. Make sure that these holes are directly opposite from each other.
2. Cut two holes in middle of the 9cm by 6 cm sides: one to place the L.E.D light and the other for the light sensor on the iPod. The hole cut out for the L.E.D light should be slightly narrower and wider than the other, and the hole cut for the iPod sensor should be more of a square. Make sure that these holes are directly opposite from each other.

3. Cover the narrow hole with masking tape on BOTH INSIDE and OUTSIDE
4. Poke two small holes through the masking tape with a pencil or needle approximately .5 cm apart for the L.E.D. You need to do this because aluminum foil is a conductive material and will short-circuit the light emitting diode. This part is very important.
5. Insert the L.E.D through the hole making sure that the L.E.D will be lighting up the inside of the box.
|
6. Make sure the LED is pointing straight at the camera because the top of the led gives off the most light. So if the LED is at an angle, less light will reach the ipod’s light meter.
7. Place the iPod beside the box with the camera lined up with the square hole. You can check to make sure the size of the hole is correct by looking through the iPod camera. 8. Create another hole on the 6 cm by 12 cm side using the thermometer. Make sure the needle of the thermometer is right beside the L.E.D. The thermometer that we used is the TPI 316 C (which has an accuracy of +/- 2 degrees Fahrenheit accuracy). 9. Tape the entire box onto a stable platform to insure that the wind from hair dryer will not move the box. We used the lid of a skyflakes cracker container. |

|
10. Set up a table to record your data on a piece of paper
Making the circuit

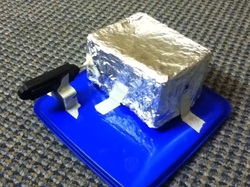
1. We didn’t have a variable power supply or a universal ac adapter so we had to do with a 7809 ic, a 20V ac adapter, few strands of wires, a breadboard, and a 330 ohm resistor. This is a picture of our circuit ( see below )
|
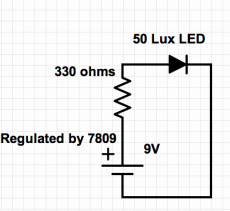
2. Here is the schematic diagram for our circuit. You don’t have to use a 7809 ic. You just need a constant reliable power supply. We didn’t want to use a 9V battery because the voltage decreased after a while and it wasn’t reliable.
|
beginning the Experiment
1. Set the hair dryer to the “hot” setting. Place the dryer approximately 10 cm away from the side of the aluminum foil box that does not have the L.E.D on it. Note: You may want to try to point the dryer away from the iPod so that you don’t damage the device. You may also want to place a barrier between the hair dryer and the iPod for further protection. We used a hardcover book.
2. Record the temperature and the lux of the L.E.D before you turn on the hair dryer. This will be the starting data for you table
3. Turn the hair dryer on to the “high” setting. Have one person watching the lux meter and another person holding the hair dryer and watching the thermometer.
4. Watch the lux meter. Whenever the lux of the L.E.D changes, record that temperature at which it changed onto the table.
5. Turn the hair dryer off once you see that the temperature has steadied to a stable temperature and isn’t rising anymore.
6. Repeat steps 1 – 5, 4 times. Create new tables for each trial that you complete. Remember to change the LED because the heat may have affected how it functions. Also let the box and the thermometer cool down to 77°C (+/- 1°C) before beginning the next trial
